# BootNode Blog
> BootNode's blog on Web3 and blockchain development -- dApp tooling, DeFi protocols, cross-chain interoperability, smart contract security, and developer experience.
## Blog Posts
- [BootNode's Journey into Zama's fhEVM: The Raw Developer Experience](https://blog.bootnode.dev/posts/zama-fhevm-developer-experience/llms.txt): We built with Zama's fhEVM to test FHE beyond the hype. The cryptography works — but the developer experience reveals a technology still finding its footing.
- [Rebuilding Web3 UX: BootNode's First Experiments with Porto](https://blog.bootnode.dev/posts/porto-pocs/llms.txt): Web3 UX is still painful. BootNode has been testing Porto (Ithaca, now Tempo), a fresh approach to making blockchain interactions feel invisible.
- [dAppBooster v2: faster starts, Chakra UI v3, and a one-line install](https://blog.bootnode.dev/posts/dappbooster-version-2/llms.txt): We shipped dAppBooster v2 with a new UI stack, a one-command install, and clearer docs so you can scaffold a production-ready dApp in minutes.
- [The Khalani chapter: how we wired Khalani into Nexus bridge](https://blog.bootnode.dev/posts/the-khalani-chapter/llms.txt): We plugged Khalani into Hyperlane’s Nexus bridge so users can bridge supported tokens and chains in one simple flow.
- [The OIF chapter: a practical, modular path to intent products](https://blog.bootnode.dev/posts/the-oif-chapter-a-practical-modular-path-to-intent-products/llms.txt): Most teams don’t want to build an intent stack from scratch: The Open Intents Framework packages the essentials—contracts, a solver, and a UI template—so you can assemble an intent product that fits your stack and swap parts later.
- [The Interop Experience: BootNode’s Path into Hyperlane via Bounties](https://blog.bootnode.dev/posts/interop-experience-bootnode-path-into-hyperlane-via-bounties/llms.txt): Sometimes, the fastest way to build a relationship in Web3 isn’t a cold DM or pitch deck, it’s a pull request. We were curious about Hyperlane and the interop vertical more broadly. But instead of waiting, we dove into the codebase through Hyperlane’s public bounty board.
- [Intro to Interop Experience: OIF 1.0, Hyperlane, Khalani, Espresso](https://blog.bootnode.dev/posts/interop-intro/llms.txt): BootNode’s journey in blockchain interoperability, from Hyperlane bounties to OIF 1.0, Espresso Hackathon, and Khalani integration—driving seamless cross-chain experiences and advancing the interop ecosystem.
- [Hyperlane Warp Routes Rebalancer](https://blog.bootnode.dev/posts/hyperlane-mcwr-rebalancer/llms.txt): How BootNode contributed to automate the Multi-Collateral warp routes liquidity rebalancing
- [Eigenlayer Slashing upgrade: Key Features and Implications for YieldNest](https://blog.bootnode.dev/posts/yieldnest-el-slashing-upgrade/llms.txt): How we helped YieldNest, a Liquid Restaking protocol, to adapt ynETH and ynLSDe smart contracts to ensure secure balances and accurate withdrawals post-upgrade.
- [Get Boosted: Power Up Your dApp Development](https://blog.bootnode.dev/posts/power-up-your-dapp-development/llms.txt): dAppBooster isn’t just another template: it’s a full-blown dApp development booster pack built on the latest and greatest tools in the ecosystem.
- [Token Input UX Analysis: A Comprehensive Review and Improvement Suggestions](https://blog.bootnode.dev/posts/token-input-UX-analysis/llms.txt): The token input component in the dAppBooster web3 boilerplate is a powerful and user-friendly tool designed to simplify blockchain token interactions.
- [Quality Assurance in Web3: Setting Up for Testing](https://blog.bootnode.dev/posts/quality-assurance-in-web3-setting-up-for-testing/llms.txt): This blog article will guide you through obtaining gas tokens, bridging them across different EVM chains, and creating ERC20 tokens for testing purposes.
- [Kickstarting Your dApp Journey with dAppBooster!](https://blog.bootnode.dev/posts/kickstarting-your-dapp-journey/llms.txt): Starting your journey into decentralized app development can be overwhelming, but dAppBooster simplifies the process.
- [dAppBooster](https://blog.bootnode.dev/posts/dappbooster/llms.txt): In the rapidly evolving world of Web3, developers are constantly seeking tools that simplify and accelerate the creation of decentralized applications (dApps).
- [Hello Web3 from Bootnode!](https://blog.bootnode.dev/posts/hello-web3/llms.txt): We are excited to launch the official blog of bootnode.dev, a hub for innovation, blockchain, and decentralized technologies.
---
## BootNode's Journey into Zama's fhEVM: The Raw Developer Experience
Date: 2026-03-25T00:00:00-03:00
Author: Lucho
URL: https://blog.bootnode.dev/posts/zama-fhevm-developer-experience
We recently wrapped up a fast-paced development sprint at BootNode focused entirely on the Zama ecosystem. We wanted to move past the theoretical hype of Fully Homomorphic Encryption (FHE) and see what it takes to actually build a confidential decentralized application today.
**The cryptography works.** It is genuinely a breakthrough. The developer experience, however, is a different story.
Building with Zama's fhEVM forces a complete rewiring of how you approach smart contract design. Our engineers spent weeks in the trenches dealing with the friction between groundbreaking protocol design and immature tooling. This is an unfiltered look at our experience.
## From Public Variables to Encrypted Scopes
At BootNode, we are used to pushing the boundaries of Web3 infrastructure. We know that Zero-Knowledge Proofs (ZKP) let developers verify statements without revealing data, but they often require leaving standard Solidity for complex languages.
FHE offers a different path: you write standard Solidity, but it executes directly on encrypted variables. This unlocks entirely new design spaces:
- **Privacy-preserving DeFi** (dark pools, hidden order books)
- **Secure institutional operations** (confidential RWA management)
- **Confidential voting systems** where the state remains hidden even from node operators
The mental shift for our team was profound. We had to stop thinking about public variables and start thinking entirely in encrypted scopes.
## Documentation Gaps and Trial by Fire
Zama gets the high-level documentation right. Our team quickly understood the general architecture involving off-chain coprocessors, the Key Management System (KMS), and the Access Control List (ACL).
However, theoretical knowledge falls apart during practical execution. The quickstart templates provide a basic `FHECounter`, which is trivial for modern dApps. We attempted to build standard patterns like an ERC-7984 confidential token, which requires:
1. Encrypting a value on the client.
2. Storing it securely on-chain.
3. Updating the ACL dynamically.
4. Requesting asynchronous decryption via a relayer.
There is currently no comprehensive cookbook for these workflows. Our engineers were forced to rely on trial and error, piecing together fragments of community conversations to reach a functional state.
## Dealing with the WASM Payload and UX Friction
While setting up a local environment using the `fhevm-hardhat-template` was straightforward, integrating the SDK into our frontend was a major bottleneck.
- **Payload size:** Client-side cryptographic operations depend on a WebAssembly (WASM) module. The unpacked size of the `fhevmjs` package is roughly 10 MB. Pushing a payload of this size to a user destroys the "time to first interaction" metric.
- **Onboarding friction:** Users are forced to sign a cryptographic message just to load the WASM instance, followed by additional signatures to authorize data encryption. This double signature requirement creates a fragmented experience that mainstream users will not tolerate.
## Troubleshooting in the Dark
Moving to encrypted memory spaces means traditional EVM block explorers and analysis tools are effectively useless. Our engineers were flying blind.
When a transaction reverts due to a permission error, there is no standard way to query the centralized ACL contract. We had to downgrade our debugging process to blind experimentation and console logs. Furthermore, standard automated security tools like Slither fail to parse code containing FHE modifications, removing a critical layer of automated auditing.
## The AI Context Gap
We rely heavily on AI tools for fast prototyping at BootNode. However, the rapid evolution of the Zama protocol has created a massive data lag in models like Claude and GPT-4.
Historically, operations used the `TFHE` namespace; recent updates refactored this to `FHE`. AI assistants constantly suggested outdated code or non-existent functions like `FHE.sealoutput()`. We recommend adding `AGENTS.md` or `CLAUDE.md` files to key repositories to provide AI agents with strict API directives.
## Developer Tips for fhEVM
1. **Optimize your frontend.** Use lazy loading for the `fhevmjs` module to avoid blocking the initial render.
2. **Design for UX.** Build workarounds (like batching or account abstraction) to handle the multiple signature requirements.
3. **Plan for manual debugging.** Allocate extra time for testing, as you won't have standard block explorers or automated audit tools.
4. **Verify AI suggestions.** Always cross-reference `FHE` namespace suggestions with the [latest Zama repositories](https://github.com/zama-ai).
## What's Next
At BootNode, we believe Zama has cracked the cryptography. The fhEVM is a foundational primitive for MEV-resistant DeFi and institutional adoption. But a brilliant engine is useless without a steering wheel.
We are looking forward to seeing the community prioritize reducing client-side WASM sizes and enabling native fuzz testing in Foundry. The era of confidential computing is here; now it's time to build the infrastructure required to use it in production.
We are actively exploring how to push fhEVM closer to production-readiness. If you're building with Zama's stack or want to discuss confidential computing for your project, we'd love to connect — reach out at [contact@bootnode.dev](mailto:contact@bootnode.dev) or ping us on Telegram: [@mgarciap](https://t.me/mgarciap).
---
## Rebuilding Web3 UX: BootNode's First Experiments with Porto
Date: 2025-10-21T00:00:00-03:00
Author: BootNode
URL: https://blog.bootnode.dev/posts/porto-pocs
Web3 UX is still painful. BootNode has been testing Porto (Ithaca, now Tempo) - a fresh approach to making blockchain interactions feel invisible.
## Web3 UX is still broken, and everyone knows it
Every wallet popup, transaction confirmation, and gas warning is a reminder that we've built an ecosystem for crypto-natives. The tech is incredible, but the experience feels like debugging the internet back in the 90s.
At BootNode, we've always believed the next wave of adoption won't come from new narratives - it'll come from better UX. That's why we've been exploring [Porto](https://porto.sh/), a new developer layer from Ithaca that's rethinking how users interact with onchain actions.
## Why UX Is the Real Bottleneck
Building onchain is easier than ever, but using it still isn't. The barrier isn't crypto's complexity, it's how that complexity leaks into every interaction.
For most users, setting up wallets (seed phrases, PKs), switching networks, approving tokens, and managing keys is just too much. Until we make those interactions seamless, adoption will plateau.
Better UX isn't a nice-to-have. [It's the only way Web3 scales beyond speculation.](https://www.paradigm.xyz/2025/10/ithaca-x-tempo)
## Porto: The UX Layer We've Been Waiting For
[Porto](https://porto.sh/) feels like a bridge between Web2-level simplicity and Web3 principles. It gives developers unified primitives for common onchain actions (Pay, Swap, Earn) while handling the technical complexity in the background.
Think of it as a UX engine that turns DeFi workflows into single-step actions. Users don't need to think about contract calls or approvals. They just do what they came to do.
That's the kind of design maturity Web3 has been missing.
## Our First Experiments
We decided to get our hands dirty and build a few simple prototypes. You can try them yourself:
- [**Pay**](https://porto-pocs.vercel.app/payments/new) – send/receive funds directly to a wallet in a few clicks.
- [**Swap**](https://porto-pocs.vercel.app/swap) – exchange tokens via Uniswap with a clean, minimal interface.
- [**Earn**](https://porto-pocs.vercel.app/earn) – deposit into Aave and start earning yield instantly.
Each feature was built using Porto's primitives. No custom UX scaffolding, no wallet pain. Just clean flows that feel... right.
After building these, it's hard to go back. Super simple to integrate, a few hours and things just... work. It feels like the Web3 we've all been trying to reach: direct, instant, and human.
### Integrating Porto into dAppBooster
Our next step is to bring this experience into [dAppBooster](https://dappbooster.dev/), our toolkit for accelerating dApp development.
We're adding Porto as a new connector, so any project using dAppBooster can tap into Porto's UX layer from day one. That means developers can ship smooth user experiences without reinventing the basics.
Imagine deploying a dApp where payments, swaps, and yield are ready to go, and the UX just works.
### Looking Ahead
We're still early, but this feels like a step toward a better user-facing Web3. The energy around Porto reminds us of why we build: to make decentralized systems usable, not just powerful.
Over the next months, we'll keep experimenting, gathering feedback, and seeing how Porto fits into our dev stack.
Because in the end, **UX isn't an afterthought. It's infrastructure.**
## Why BootNode
We have shipped [bridges, explorers, and interop tooling](https://blog.bootnode.dev/posts/interop-intro) for years and contributed upstream to [Hyperlane](https://www.hyperlane.xyz/). That history speeds up discovery, reduces risk, and shortens delivery. The [Khalani](https://khalani.network/) team highlighted the same points when they talked about our work together, including our push for a light-SDK to raise the odds of official support and to simplify future integrations.
If you are exploring intent UX or multi-chain onboarding and want to wire [Khalani](https://blog.bootnode.dev/posts/the-khalani-chapter) into your bridge or app, reach out. We can help scope it and ship it with a clean path to upstream.
---
## dAppBooster v2: faster starts, Chakra UI v3, and a one-line install
Date: 2025-09-15T00:00:00-03:00
Author: Gabito
URL: https://blog.bootnode.dev/posts/dappbooster-version-2
## What’s new in v2
dAppBooster v2 focuses on speed to first commit. We rebuilt the UI layer on [Chakra UI v3](https://chakra-ui.com/), tightened up theming, and added a [one-line install](https://docs.dappbooster.dev/introduction/installation) so you can scaffold a clean project with your choices baked in. The docs and component tech docs were refreshed to match.
## Why we moved off Styled Components
Styled Components is now in [maintenance mode](https://opencollective.com/styled-components/updates/thank-you). The maintainer recommends not adopting it for new projects. That changed the calculus for long-lived Web3 frontends, where stability and upgrade paths matter.
Chakra UI v3 gives us a consistent, composable, and fast component system. v3 is a rewrite geared toward better performance, a more uniform API, and modern design tokens. For a starter kit, this means smaller custom surface area and fewer surprises when you scale.
## Install in one line
You can bootstrap a new dAppBooster project without cloning anything manually, just run this command and follow the instructions:
```bash
pnpm dlx dappbooster
```
This scaffolds a fresh project with sane defaults for Web3 frontends. It ships with wallet connectivity, a modular structure, and multi-chain hooks so you can focus on your product, not your setup.
You can browse the [live components demo](https://demo.dappbooster.dev/) and the [documentation](https://docs.dappbooster.dev/) if you prefer to evaluate before installing.
## Quick start for devs
1. **Run the dev server.** After the script finishes:
```bash
cd
pnpm dev
```
Open the provided local URL, and that's it. (*)
(*) If you opted into subgraphs, add your API key and run the codegen step. [The docs](https://docs.dappbooster.dev/introduction/installation) walk you through the env vars and generation command.
2. **Configure wallets and chains.** The template ships with wagmi and viem. wagmi provides React hooks for accounts, transactions, and contracts. viem supplies a lightweight, type-safe interface to Ethereum RPC.
3. **Build your first flow.** Use the [“My first dApp” recipe](https://docs.dappbooster.dev/introduction/getting-started) to wire up a simple WETH wrap/unwrap on Sepolia. It shows how the parts fit together fast.
4. **Browse component examples.** The live demo and component tech docs show patterns you can copy into your app.
## What’s inside the stack
**dAppBooster** stays pragmatic: React and TypeScript with Vite for fast builds. On-chain integration uses wagmi and viem for typed, composable calls. Data fetching and caching runs on TanStack Query. This combination offers strong typing, cache control, and predictable network behavior out of the box.
If your app talks to multiple subgraphs, the included plugin generates typed GraphQL clients and integrates them with TanStack Query, so you get inference and cache policy in one place.
## What’s next
We are shipping small improvements to the component catalog and expanding the recipes. We track feedback in the repo and the docs. If you have ideas or find quirks, open an issue or a PR. You can also follow [updates from BootNode](https://x.com/bootnodedev).
---
## The Khalani chapter: how we wired Khalani into Nexus bridge
Date: 2025-09-10T00:00:00-03:00
Author: BootNode
URL: https://blog.bootnode.dev/posts/the-khalani-chapter
We worked with Khalani to plug its intent network into Hyperlane’s Nexus bridge, so users can bridge supported tokens and chains with one simple flow.
## Why this matters
Cross-chain UX still feels like switching trains mid-journey. People just want to move value or call an app on another chain without juggling bridges, gas, or mental models. [Hyperlane’s Nexus](https://hyperlane.xyz/post/introducing-nexus-the-interface-for-the-modular-ecosystem-powered-by-hyperlane) brings many ecosystems under a single interface so users can transfer tokens between Hyperlane or IBC integrated chains from one place. That is a big step toward practical interop for real users.
[Khalani](https://khalani.network/) focuses on intent-driven transactions. You define the outcome and bounds, then its solver network handles pathfinding, routing, gas, and settlement. That model fits cross-chain flows well because it hides execution details while keeping strong guarantees on the result.
## What we built
Khalani asked us to extend the Nexus bridge so when a user needs to bridge a Khalani supported token or chain, Nexus can use Khalani’s infrastructure behind the scenes. Our goal was simple: keep the familiar Nexus UI, but give it a new route where it makes sense. We shipped the integration with a strong bias for compatibility and low risk.
On Hyperlane's side we worked with the [Warp Route UI](https://docs.hyperlane.xyz/docs/guides/warp-routes/bridge-ui-guide) template and SDK, validating configs against the canonical registry and adapting the UI where needed. On Khalani's side we ensured the route selection could defer to Khalani for supported pairs without breaking existing paths. We also recommended a light-SDK design so the integration could be upstreamed cleanly and made repeatable for future networks. The approach helps Khalani stay in sync with new chains added to Hyperlane and to the Nexus interface.
## How it works today
1. A user opens Nexus and selects a source chain, destination chain, and token. If the pair is supported by Khalani, the UI can present that path as a normal option. Users do not need to change how they bridge.
2. When the user confirms, Nexus invokes the configured route. Hyperlane handles message passing and token routing. When Khalani is selected, its infrastructure covers routing and execution while preserving outcome bounds.
3. Settlement and state updates return through Hyperlane’s standard flows. From the user’s point of view it is just a bridge transaction that completes as usual.
This keeps the UI stable while letting the infra evolve. If you are curious about defaults and security assumptions around Nexus, L2BEAT has a [good explainer](https://l2beat.com/bridges/projects/hyperlane).
## How we approached safety and compatibility
Bridges live at the sharp end of risk. Two rules guided us: do not surprise users, and change as little as possible in the security stack. We also kept flows the same and showed route provenance. Hyperlane’s ISMs are modular, so routes can pick a custom ISM when needed. We respect defaults and allow overrides where Khalani or a destination chain requires them.
We also audited configuration boundaries. Route definitions must agree on token metadata, decimals, and router addresses across chains. Mismatches in these areas create the most common class of integration bugs. We codified checks in CI so contributors see errors before anything reaches a user.
## Route selection and fallbacks
Nexus already aggregates multiple token routes. The Khalani path is just one more option where it adds value. The UI can surface this path exactly like any other route. If a given token or chain is not supported by Khalani, Nexus uses the existing Hyperlane route. This keeps the experience predictable and reduces edge cases. It also means we can roll out support incrementally without blocking unrelated flows.
On the execution side, Khalani provides outcome bounds and a solver network that handles the hard parts: finding liquidity, paying gas, and assembling a safe path. If those bounds cannot be met inside the configured constraints, the transfer does not proceed. Users keep custody unless guarantees are satisfied. That is the right failure mode for cross-chain UX.
### What developers can reuse
You can reproduce this pattern for other networks. Start from the Warp Route UI template, wire your registry, and keep configs in version control. When you need a new route, add it behind a simple capability check so the UI presents it only when it actually works. Keep observability uniform across routes so user support does not fragment.
If you are integrating Khalani specifically, the light-SDK approach keeps the interface narrow between Nexus code and Khalani services.
## Why BootNode
We have shipped bridges, explorers, and interop tooling for years and contributed upstream to Hyperlane. That history speeds up discovery, reduces risk, and shortens delivery. The Khalani team highlighted the same points when they talked about our work together, including our push for a light-SDK to raise the odds of official support and to simplify future integrations.
If you are exploring intent UX or multi-chain onboarding and want to wire Khalani into your bridge or app, reach out. We can help scope it and ship it with a clean path to upstream.
---
## The OIF chapter: a practical, modular path to intent products
Date: 2025-09-05T00:00:00-03:00
Author: BootNode
URL: https://blog.bootnode.dev/posts/the-oif-chapter-a-practical-modular-path-to-intent-products
## The OIF chapter: how we got here
At the end of 2024 we began codifying a framework that would let teams deploy "intent product experiences" quickly—less BD, less bespoke infra, more shipping. The goal: a path from idea to live cross‑chain UX without forcing anyone into one solver network, one bridge, or one security model. That exploration matured into OIF 1.0 with [Hyperlane](https://hyperlane.xyz/) as a core interop leg.
## What’s in the box
**Composable contracts.** [OIF](https://www.openintents.xyz/) ships a set of contracts for expressing and settling intents, including a [Base7683 layer](https://github.com/BootNodeDev/intents-framework/blob/main/solidity/src/Base7683.sol) aligned with ERC‑7683 so orders and settlement flow are standardized. You can extend or swap settlement modules to suit your security and latency needs.
**An open solver.** The [reference solver](https://github.com/BootNodeDev/intents-framework/tree/main/typescript/solver) handles discovery, execution, and settlement orchestration. Use it as‑is to get moving, or fork it to bring your own routing logic and liquidity hookups. The point is optionality, not lock‑in.
**A starter UI.** OIF includes a [customizable template](https://github.com/BootNodeDev/intents-framework/tree/main/typescript/ui) so your front end isn’t a blank page. It mirrors battle‑tested flows from prior Hyperlane work to help teams avoid common UX potholes.
## Why Hyperlane is the right interop leg
Hyperlane is permissionless to integrate and modular at the security layer. Its Interchain Security Modules (ISMs) let apps pick verification models—aggregate multiple verifiers for high‑value flows or keep it lighter for routine transfers. That composability maps cleanly onto OIF’s "swap the parts you want" ethos and gives teams credible, configurable settlement without a gatekeeper.
### How it comes together
1. A user signs an ERC‑7683 intent (e.g., swap + bridge).
2. The solver discovers it, finds the best path, and prepares fills.
3. Settlement flows through your chosen module. Hyperlane ISMs by default or another path you configure.
4. The UI tracks status and confirms the outcome. **Each piece is swappable:** change your solver strategy, change your settlement module, keep the rest.
### What this unlocks for teams
* **Speed to market:** Start from working contracts, a solver, and a UI instead of months of undifferentiated infra.
* **Real modularity:** Choose the parts that fit today and replace them later. OIF treats intents as an interface, not a product SKU. The EF explicitly calls out this modularity and the ability to "swap pieces of the intents stack.".
* **Ecosystem alignment:** Building on shared standards like ERC‑7683 reduces fragmentation and lets you tap into a growing pool of solvers and settlement options.
## Backed by the ecosystem
This isn’t a one‑team effort. The [EF](https://ethereum.org/en/foundation/), Hyperlane, BootNode, and many L2 contributors have pushed OIF forward, and the EF recently highlighted OIF as a cornerstone in its UX‑focused protocol update. That support matters: it brings more reviewers, more audits, and more builders. Exactly what intent‑centric apps need to harden and scale.
## Where to go next
If you’re intent‑curious, start with OIF’s site and repos, wire in Hyperlane for settlement, and ship a narrow flow first (simple swap + bridge) before you optimize routes and rebalancing. Treat the framework like legos: assemble, measure, then swap the pieces that need to evolve.
---
## The Interop Experience: BootNode’s Path into Hyperlane via Bounties
Date: 2025-09-01T00:00:00-03:00
Author: BootNode
URL: https://blog.bootnode.dev/posts/interop-experience-bootnode-path-into-hyperlane-via-bounties
## Why Bounties, Why Hyperlane
[Hyperlane](https://hyperlane.xyz/) stood out early as one of the most interesting players in the interop space. Their modular, permissionless approach to interchain messaging looked like a meaningful evolution from the more rigid bridging models we’d seen before. As a Web3 dev and research studio, we were keen to get closer.
But "getting closer" via traditional BizDev channels wasn’t working: conversations were slow, and it was hard to stand out. So we looked at Hyperlane's GitHub bounty board and saw an opportunity: skip the formalities, ship something useful.
## Getting Our Hands Dirty: Learning Through Contribution
Bounties weren’t just a way to engage, they were a crash course in how Hyperlane actually worked. We picked four issues that seemed achievable but non-trivial: integrating Hyperlane with DeFiLlama, streamlining Warp Routes deployment, improving E2E testing, and building generic middleware for cross-chain contract deployment.
Each bounty pulled us deeper into Hyperlane’s logic, design choices, and dev experience. We weren’t just solving isolated issues, we were onboarding ourselves into their ecosystem.
## The DeFiLlama Adapter
- Bounty issue: [Track Hyperlane bridge data on DeFiLlama](https://github.com/hyperlane-xyz/hyperlane-monorepo/issues/4396)
- Solution PR: [DeFiLlama integration](https://github.com/DefiLlama/bridges-server/pull/287)
This bounty aimed to expose Hyperlane bridge data on DeFiLlama. That meant parsing how Hyperlane routes messages, mapping chain metadata, and plugging into DeFiLlama’s existing infra.
It wasn’t glamorous work, but it was real. The merged PR now makes Hyperlane visible on a key analytics platform and signaled to Hyperlane that we could work within both ecosystems.
## Warp Routes Deployer
- Bounty issue: [Make Warp Routes deployable from a single chain/UI](https://github.com/hyperlane-xyz/hyperlane-monorepo/issues/3498)
- Solution repo: [Hyperlane warp routes interchain deployer](https://github.com/BootNodeDev/hyperlane-wrid)
Warp Routes handle interchain tokens in Hyperlane, but deploying them was clunky. We built tooling to simplify that process: deploy once, manage easily.
The project made dev onboarding smoother and showed us how much abstraction interop UX still needs. These learnings directly fed into later work on OIF.
## Foundry E2E Fork Testing
- Bounty issue: [E2E foundry fork testing with Hyperlane mailboxes should be easier](https://github.com/hyperlane-xyz/hyperlane-monorepo/issues/2175)
- Solution PR: [Foundry fork testing improvements](https://github.com/hyperlane-xyz/hyperlane-monorepo/pull/4519)
Testing Hyperlane apps in [Foundry](https://getfoundry.sh/) forks was painful, especially when it came to setting up mailboxes. We improved the process with a testing utility that simplifies running full interchain flows in local forks.
This one scratched our dev-itch: more confidence in tests, less manual config.
**Bonus:** it's useful infra others can build on.
## Generic Contract Deployment Middleware
- Bounty issue: [Generic contract deployment middleware / Cross-chain create2 factory](https://github.com/hyperlane-xyz/hyperlane-monorepo/issues/2232)
- Solution repo: [Hyperlane InterchainCreate2FactoryRouter](https://github.com/BootNodeDev/hyperlane-create2-factory-router)
This was about building a cross-chain contract deployment tool, something like a create2 factory that could work across chains using Hyperlane messages.
It allowed us explore more deeply how state and bytecode propagate through Hyperlane’s system. And it pointed to a bigger opportunity: programmatic, interoperable infra for contract orchestration.
## From Code to Conversation
By the time we wrapped the fourth bounty, we weren’t just contributors, we were collaborators. We had a better understanding of Hyperlane’s priorities, architecture, and dev culture. **And we had something far better than a pitch:** working code they’d merged.
That opened the door to real conversations. We weren’t some anonymous studio, we were the ones who shipped the DeFiLlama integration, the Warp Routes deployer, the fork testing utility, and the cross-chain factory. It gave us context, credibility, and momentum.
It also gave us a foothold in the interop vertical and set the stage for what would become OIF 1.0.
---
## Intro to Interop Experience: OIF 1.0, Hyperlane, Khalani, Espresso
Date: 2025-08-20T09:00:00-03:00
Author: BootNode
URL: https://blog.bootnode.dev/posts/interop-intro
## Why Interop, why Hyperlane?
Our team has delivered Gnosis Bridge and Explorer and was about to wrap up uRamp (on-/off-ramping dApp) at the beginning of 2024. At that point we realised that interop is where we should be digging deeper into to resolve fragmentation, user and developer experience issues that were in the spotlight.
That's when Hyperlane caught our attention and we started exploring Hyperlane bounties to find a way to contribute, deliver value and partner with an amazing team.
### The Bounties chapter
The team’s **first bounty** involved exposing Hyperlane bridge data on DeFiLlama. This required understanding Hyperlane's message routing and chain metadata and mapping that structure to DeFiLlama’s existing bridge tracking patterns.
While the task was relatively low-profile, the resulting pull request was merged, demonstrating technical competence and a solid grasp of Hyperlane’s stack.
The **second bounty** addressed deployment friction for Warp Routes, Hyperlane’s mechanism for handling interchain tokens. The team built a solution to automate and simplify deployment from a single UI or chain. This improved developer experience and exposed interop UX bottlenecks.
The experience helped shape thinking that later influenced work on **OIF 1.0**.
**Full-experience:** [The Interop Experience: BootNode’s Path into Hyperlane via Bounties](https://blog.bootnode.dev/posts/interop-experience-bootnode-path-into-hyperlane-via-bounties)
### The OIF chapter
Hyperlane introduced us to the idea of building a framework for building and deploying intent product experiences at the end of 2024. As a result of our collaboration, developers can leverage a suite of modular abstractions - including a solver and composable smart contracts - to customize and deploy intent-based protocols with ease, instead of building intents infrastructure from scratch.
By modularizing key components of the intents stack, such as **solving** and **settlement**, the Open Intents Framework gives developers the flexibility to mix-and-match parts that are best suited to their specific needs, without being locked into a single vendor.
**Full-experience:** [The OIF chapter: a practical, modular path to intent products](https://blog.bootnode.dev/posts/the-oif-chapter-a-practical-modular-path-to-intent-products)
### Bonus Track: The Global Espresso Hackathon
OIF received great support by the community and was promoted by the Ethereum Foundation. Additionally, Espresso Network ran Build & Brew - Espresso Global Hackathon that included a challenge to build cross-chain apps using OIF. It was an opportunity we couldn’t miss and we jumped in to support the initiative. We hosted a workshop aligned with the Open Intents Framework and its GitHub repo, spread the word to attract top builders, joined as a judge and participated in office hours to support builders throughout the hackathon.
Numbers spoke for themselves:
- 486 hackers joined
- 156 project submitted
- 91 Espresso-integrated Arbitrum Orbit chains deployed
- 12 finalists pitched at Pitch Day
It’s been an amazing experience end-to-end that we’d be happy to repeat it all over again!
### The Khalani chapter
Thanks to all our prior interop experience and drive to move the industry forward, we engaged with Khalani Network to get it integrated into the Nexus bridge, so when a user has the need to bridge Khalani supported tokens/chains, it will be using Khalani infrastructure behind the scenes.
> "BootNode's prior experience with Hyperlane SDK and WarpRoute UI made the integration easy. Their familiarity with the technology and requirements in our ecosystem enabled us to quickly move from requirements gathering to implementation. Their guidance helped us maintain backward compatibility of the Hyperlane stack. BootNode team has also proposed building a light-SDK to maximize the likelihood of upstream, official support of the Khalani integration and to make future integrations easier. This integration enables Khalani to keep up with new chains added to the hyperlane ecosystem on day 1 through the Nexus bridge."
— Tannr, *Co-founder at Khalani Network*
**Full-experience:** [The Khalani chapter](https://blog.bootnode.dev/posts/the-khalani-chapter)
### The Warp Routes Rebalancer chapter
As part of our initial bounty work, our team learned a lot about Hyperlane and most importantly Warp Routes, which positioned us well to contribute effectively to the MCWR rebalancer.
A few months after OIF saw the light of day, we implemented a rebalancer agent that monitors liquidity across all collateral chains and automatically moves tokens between them. This prevents situations where a destination chain lacks sufficient collateral to fulfill withdrawal requests.
**Full-experience:** [Hyperlane Warp Routes Rebalancer](https://blog.bootnode.dev/posts/hyperlane-mcwr-rebalancer)
> "Working with the BootNode team has been super easy. Their expertise, dedication, and proactiveness were exactly what we were looking for in a partner to work on the Open Intents Framework and our recent rebalancer project. OIF 1.0 was delivered just three months after kick-off and received a lot of interest and strong community support. For the rebalancer, the BootNode team handled everything—from architecture and agent services to testing and documentation—making integration with our smart contracts seamless. A big thank you to the entire BootNode team for their hard work and commitment!"
— Nam Chu Hoai, *Co-founder/CTO at Hyperlane*
Follow along on the journey and learn more about each chapter in a detailed blog posts that will follow!
## BootNode
[BootNode](https://www.bootnode.dev/) is a high-output engineering and product shop specializing in DeFi, staking, infrastructure, and interoperability. We help protocols and builders ship faster and scale smarter — from zero to mainnet and beyond. Explore other projects and [get in touch](https://www.bootnode.dev/#caseStudies).
---
## Hyperlane Warp Routes Rebalancer
Date: 2025-08-06T00:00:00-03:00
Author: BootNode
URL: https://blog.bootnode.dev/posts/hyperlane-mcwr-rebalancer
## Hyperlane Warp Routes Rebalancer
Hyperlane is an interoperability protocol that lets blockchains talk to each other, enabling permissionless cross-chain messaging and asset transfers, without relying on a central authority.
Hyperlane Warp Routes (HWR) are cross-chain bridges that let you move tokens between different blockchains. Depending on the configuration, when you bridge a token through a warp route, tokens can be locked as collateral on the original chain and minted on the destination as synthetic tokens, or locked on the origin and released from the collateral pool on the destination.
### Problem
Warp routes can include multiple chains as collateral sources, creating what's called Multi-Collateral warp routes. Take a USDC warp route that connects Optimism, Arbitrum, and a Custom Chain. Optimism and Arbitrum act as collateral chains, bridging USDC from either of these locks the tokens as collateral. The Custom Chain is set up as synthetic, so bridging USDC there mints new tokens instead of releasing existing ones.
Consider this scenario: I bridge 500 USDC from Arbitrum to the Custom Chain. The 500 USDC gets locked on Arbitrum, while 500 synthetic USDC is minted on the Custom Chain. Later, if I want to bridge 200 USDC from the Custom Chain to Optimism, the transaction would fail. Why? Because all 500 USDC is locked on Arbitrum, leaving zero liquidity available on Optimism to fulfill the withdrawal request. This liquidity imbalance prevents the bridge operation from completing, the classic cross-chain pain.
**Note:** This is a simplified example where all liquidity comes from a single transaction to illustrate the problem clearly.
### Solution
The BootNode team implemented a rebalancer agent that monitors liquidity across all collateral chains and automatically moves tokens between them, as required. This prevents situations where a destination chain lacks sufficient collateral to fulfill withdrawal requests.
The rebalancer consists of 3 main modules:
#### Monitor
The monitor polls collateral balances at regular intervals defined in the rebalancer configuration. It also emits additional chain data, which is useful for metrics and logging.
#### Strategy
Based on collateral balances from the monitor, the strategy determines if rebalancing is needed and calculates the required token movements. For example, continuing from our earlier scenario, if the strategy requires all chains to maintain at least 200 USDC, it would determine that 300 USDC needs to move from Arbitrum to Optimism.
#### Rebalancer
The rebalancer executes the strategy by calling a newly added rebalance function on the collateral contracts. This initiates a bridge transaction using a specified bridge protocol (like USDC CCTP) to transfer the required amount between chains.
After rebalancing, Optimism would have the 200 USDC collateral needed to fulfill the withdrawal request.
### Contribution
BootNode became a core contributor to the Hyperlane monorepo, where our team developed and shipped the rebalancer agent as a long-running service within the Hyperlane CLI. The implementation was merged into the main via PR [#6044](https://github.com/hyperlane-xyz/hyperlane-monorepo/pull/6044) on June 19, 2025 — now live and ready for teams scaling warp routes across chains.
---
## Eigenlayer Slashing upgrade: Key Features and Implications for YieldNest
Date: 2025-06-18T17:00:00-03:00
Author: Fernando Zavalía
URL: https://blog.bootnode.dev/posts/yieldnest-el-slashing-upgrade
EigenLayer deployed a significant protocol upgrade which introduced "Slashing" on April 17, 2025. This upgrade, detailed in [EigenLayer Improvement Proposal-002 (ELIP-002)](https://github.com/eigenfoundation/ELIPs/blob/main/ELIPs/ELIP-002.md), aimed to enhance security and accountability within the EigenLayer ecosystem by introducing mechanisms that allow Autonomous Verifiable Services (AVSs) to enforce cryptoeconomic commitments or, in other words, slashing.
## Key Features of the Slashing Upgrade
1. **Slashing Capabilities**: AVSs can penalize non-compliant or underperforming operator sets by slashing their staked assets, incentivizing reliable and honest behavior.
2. **Operator Sets**: AVSs create operator groups which operators can join to secure their services. Operators in these groups earn rewards but also face slashing penalties based on the AVS's rules.
3. **Unique Stake Allocation**: Operators can allocate a percentage of their stake to an operator set. This makes that amount slashable by the owning AVS but keeps the unallocated portion safe, though the unallocated stake won't earn rewards.
For YieldNest, a Liquid Restaking protocol and one of our customers, this upgrade introduced breaking changes and accounting issues stemming from previously unaccounted slashing events. YieldNest leveraged EigenLayer by offering liquid restaking solutions that enhance yield opportunities for Ethereum (ETH) holders via Liquid Restaking Tokens (ynLSDe) and native Liquid Restaking Tokens (ynETH). Detailed breakdown of both products below.
- **ynETH**: This native liquid staking token (nLRT) allows users to restake their ETH directly into EigenLayer, earning rewards from ETH validators and a curated basket of Actively Validated Services (AVSs). Users receive ynETH tokens, which are liquid and can be utilized across various decentralized finance (DeFi) platforms.
- **ynLSDe**: Designed for holders of Liquid Staking Tokens (LSTs) from platforms like Lido, Frax Finance, Mantle, and Origin Protocol, ynLSDe enables restaking into EigenLayer. This approach allows users to earn additional yields without unstaking their assets, maintaining liquidity while benefiting from multiple reward streams.
## Slashing Upgrade Implications on YieldNest
The introduction of the Slashing Upgrade in EigenLayer presented new challenges for YieldNest’s restaking mechanisms, requiring updates to how balances and withdrawals are managed.
### Changes to Balance Tracking
When users deposit tokens into **ynETH** or **ynLSDe**, new tokens are minted based on the total assets deposited into the platform, including those restaked in EigenLayer. Previously, YieldNest’s smart contracts accounted for these restaked assets directly as part of the platform’s balance. However, with the Slashing Upgrade, this approach had to be revised since restaked assets are now subject to potential slashing.
To address this, we updated balance tracking logic to only reflect withdrawable (non-slashed) assets, excluding any funds that have been slashed due to operator misbehavior. Our revised approach ensures that slashed assets are no longer included in reported balances, offering a more accurate and secure reflection of user holdings.
### Impact on Withdrawals
Before the Slashing Upgrade, when a user initiated a withdrawal for x amount of shares, the system would process and complete the withdrawal for exactly x shares after the standard waiting period of up to 8 days. However, with the upgrade, queued withdrawals remain at risk of being slashed during this waiting period.
If slashing occurs after a withdrawal is queued, the final amount withdrawn may be y instead of x, as some of the originally requested shares may have been slashed in the interim.
To ensure an accurate balance and withdrawal process, we implemented a synchronization mechanism that updates the amount of queued shares every time a slashing event occurs. This means that the platform will continuously adjust the queued withdrawal amounts in real-time, ensuring that only the remaining non-slashed shares are accounted for in the balance and ultimately withdrawn.
By adapting to these new slashing mechanics, YieldNest ensures that users’ funds are accurately tracked, withdrawals remain fair, and the platform remains resilient in the evolving EigenLayer ecosystem.
The solution is available in the links below:
-
- [https://github.com/yieldnest/yieldnest-protocol/pull/198](https://github.com/yieldnest/yieldnest-protocol/pull/198) contains the new EigenLayer contracts.
- [https://github.com/yieldnest/yieldnest-protocol/pull/214](https://github.com/yieldnest/yieldnest-protocol/pull/214) contains ynLSDe changes.
- [https://github.com/yieldnest/yieldnest-protocol/pull/220](https://github.com/yieldnest/yieldnest-protocol/pull/220) contains ynETH changes (delivered by the YieldNest team).
## BootNode
[BootNode](https://www.bootnode.dev/) is a high-output engineering and product shop specializing in DeFi, staking, infrastructure, and interoperability. We help protocols and builders ship faster and scale smarter — from zero to mainnet and beyond. Explore other projects and get in touch [here](https://www.bootnode.dev/#caseStudies).
## YieldNest
[YieldNest](https://www.yieldnest.finance/) is a next-generation liquid restaking protocol that simplifies decentralized finance (DeFi) by offering high-yield, risk-adjusted restaking and DeFi strategies. It consolidates various DeFi strategies into unified, high-powered assets with Layer 1 settlement assurances.
## EigenLayer
[EigenLayer](https://www.eigenlayer.xyz/) is a decentralized protocol built on Ethereum that introduces the concept of "restaking," allowing ETH stakers to secure multiple protocols simultaneously. By restaking, users can delegate their staked ETH or Liquid Staking Tokens (LSTs) to various decentralized applications (dApps) and services, thereby extending Ethereum's security to these platforms without requiring additional capital. This mechanism enhances the security of emerging projects and enables stakers to earn additional rewards.
---
## Get Boosted: Power Up Your dApp Development
Date: 2025-03-28T16:00:00-03:00
Author: Gabito
URL: https://blog.bootnode.dev/posts/power-up-your-dapp-development
## Get Boosted: Kickstart Your dApp Development
*What if spinning up a new decentralized app was as easy as running a couple commands?* dAppBooster makes that dream a reality. This starter kit is like rocket fuel for your Web3 project – it comes loaded with a modern stack and best practices so you can skip the boring setup and jump straight into coding.
After years of building dApps, the team at **BootNode** created **dAppBooster** to tackle all those pesky setup hurdles (think config files, project structure, multi-chain support) and save you serious time. The result? Starting a new dApp is *smoooooth* and actually kinda fun. If you’re a developer who’s tired of reinventing the wheel for every project, **dAppBooster** is definitely worth checking out.
## Why dAppBooster Rocks (A Quick Overview)
**dAppBooster** isn’t just another template – it’s a **full-blown dApp development booster pack** built on the latest and greatest tools in the ecosystem. We’re talking **React + Vite** for a fast, modern frontend, **TypeScript** for type safety, **Wagmi + viem** for seamless blockchain interactions, and more. Under the hood, it focuses on developer experience, performance, and a sensible project structure. Here’s a taste of what you get out of the box:
- **Modern Stack:** Built with React, Vite, TypeScript, Wagmi, viem, and TanStack libraries – all integrated so you don’t have to.
- **Flexible Project Structure:** A clean organization for contracts, ABIs, subgraphs, and common components, so your code isn’t all over the place.
- **Multi-Chain Ready:** Native support for multiple chains with intuitive, type-safe configuration. Want Ethereum mainnet and a couple testnets in your app? It’s already set up.
- **Wallet Connectivity Built In:** Plug-and-play support for popular wallet connectors like ConnectKit, RainbowKit, and Web3Modal. No more wrestling with wallet integration – just choose your preferred library and go.
- **Pre-built Components:** Common UI components for dApps (forms, inputs, etc.) that are tree-shakable. Use what you need and lose the rest – keeping your bundle's bloat in check.
- **Subgraph Integration:** First-class support for subgraphs across networks, including auto-generated typed React hooks for querying data. In plain English: your frontend can pull data from The Graph with minimal fuss.
Not too shabby, right? Essentially, **dAppBooster** gives you a turbocharged starter project so you can focus on your dApp’s logic instead of yak-shaving build setups and library configs. Now let’s dive into how to actually get this thing running!
## Cloning dAppBooster
Alright, time to get our hands dirty: The easiest way is via **npx**. This will fetch and run the __dAppBooster install script__
```bash
npx dappbooster dAppBooster-firstDapp
```
Boom! 🧨 running the above creates a new folder called `dAppBooster-firstDapp` in your current directory and populate it with the dAppBooster starter kit. This is the quickest way to get started, and it’s what we’ll use in this guide. You can opt between a **clean** version and a **full featured** version which includes all the examples for you to explore (if you choose the latter, you will have to configure some environment variables later on, check the [IMPORTANT](#important) section below).
Next, step into your new project directory and install the dependencies:
```bash
cd dAppBooster-firstDapp && pnpm i
```
This will grab all the NPM packages the project needs (React, ethers, Wagmi, etc.). **Note:** The **dAppBooster** template uses **pnpm** by default for package management (it’s faster and more efficient than npm). If you don’t have pnpm yet, you can try using `npm` or `yarn`, but it’s recommended to stick with `pnpm` for consistency.
After running `pnpm i`, you should have all dependencies in place. At this point, you might want to do a couple of tiny housekeeping updates to personalize your new app:
- Open **`package.json`** and update the `"name"` fields from the generic defaults to something relevant for your project. (This isn’t strictly necessary, but it’s nice to have your project’s name reflected there instead of "dAppBooster-firstDapp" 😅).
- If you’re using version control (you probably are), you now have a fresh git repository initialized for you. The CLI wiped the old commit history, so consider making an initial commit for your brand new dApp codebase.
dAppBooster’s project structure is all set up and ready. Feel free to poke around the folders: you’ll see a logical layout with a `src/` directory containing `components/` (shared vs page-specific components), `routes/` for the pages (using TanStack Router), `constants/` for things like contract ABIs, `lib/` for configs (like network configurations), and so on. The idea is that everything has its place – meaning **you don’t have to invent a structure**; you can just follow the established conventions.
## Configuring Your dApp
Your new dApp is almost ready to launch, but there are a couple of configuration steps to make it truly yours. In practice, most of the configuration is straightforward and can be done in environment files or small code config files. Right after initialization, you should do the following:
1. **Environment Variables:** There’s an example env file in the project. Copy it and set up your own values. For instance, run:
```bash
cp .env.example .env.local
```
This creates a `.env.local` file with default settings and optional variables ready to be customized.
2. **WalletConnect Project ID (optional):** Open up `.env.local` in your editor – you’ll see some environment variables listed. You can get a Project ID for free from the WalletConnect dashboard. In the `.env.local` file, find the line for `PUBLIC_WALLETCONNECT_PROJECT_ID` and paste in your ID:
```
# WalletConnect Project ID
PUBLIC_WALLETCONNECT_PROJECT_ID=
```
3. __IMPORTANT__
If you chose the **full featured** version when cloning the repo, you will have to add and configure the following variables in `.env.local` for the subgraph demos to work (the dApp will throw an error otherwise).
```
# Subgraph
PUBLIC_SUBGRAPHS_API_KEY=
# 'development' or 'production'
PUBLIC_SUBGRAPHS_ENVIRONMENT='development'
# comma separated list of ::
# (only use the chains your dApp needs)
UNISWAP_ARB=
UNISWAP_POLYGON=
UNISWAP_OP=
AAVE_BASE=
PUBLIC_SUBGRAPHS_CHAINS_RESOURCE_IDS='$UNISWAP_ARB,$UNISWAP_POLYGON,$UNISWAP_OP,$AAVE_BASE'
# URLs for the subgraphs in development and production
# must have the replaceable strings [api-key], [resource-id], and optionally [subgraoh-id]
PUBLIC_SUBGRAPHS_DEVELOPMENT_URL='https://api.studio.thegraph.com/query/[apiKey]/[subgraphId]/[resourceId]'
PUBLIC_SUBGRAPHS_PRODUCTION_URL='https://gateway-arbitrum.network.thegraph.com/api/[apiKey]/subgraphs/id/[resourceId]'
```
After this is done, run:
```bash
pnpm run subgraph-codegen
```
You can read more about this here and here.
And done, you're all set!
---
With these configs done, your **dApp’s core settings are in place**. 👍 Most other things are already configured sensibly by dAppBooster, so you typically won’t need to mess with anything else to run the app.
**Start the development server:** Use the handy script to fire up a local dev server:
```bash
pnpm dev
```
This will compile the app and launch it in development mode (with hot-reloading and all that jazz). Open the URL it provides (usually **http://localhost:5173** or a similar port) in your browser. You should see your new dApp’s homepage up and running! 🎉 It might be a simple template page for now (probably a boilerplate welcome screen or the components' demo list if you chose that), but the important part is that everything is wired up. You can log in with a wallet, switch networks, etc.
Now that our dApp is configured and tested in development, it’s time for the final step: deploying it to the world.
## Wrapping Up
In this walkthrough, we took a tour of **dAppBooster** - from its why-is-this-cool intro, through installation, project initialization, config, and finally deployment. In a matter of minutes, you can go from nothing to a fully working scaffold of a decentralized application, complete with multi-chain support and wallet connectivity baked in.
To recap the highlights: **dAppBooster** brings you a plug-and-play dApp template powered by a modern stack, saving you from the boilerplate grind. You used the CLI to spin up a new project with one command, configured a couple of things like environment variables, and you were off to the races running your app locally and then deploying it. Instead of spending days setting up tooling, you can immediately start building features unique to your dApp.
If you’re building a Web3 frontend, give **dAppBooster** a try – it’s open source (MIT licensed) and ready to save you time. As the docs put it, it makes starting a new dApp *smoother* by focusing on what matters: development experience, stability, and performance. Now go forth and build awesome dApps, faster! 🚀
---
## Token Input UX Analysis: A Comprehensive Review and Improvement Suggestions
Date: 2025-03-25T17:00:00-03:00
Author: Tomás Löffler
URL: https://blog.bootnode.dev/posts/token-input-UX-analysis
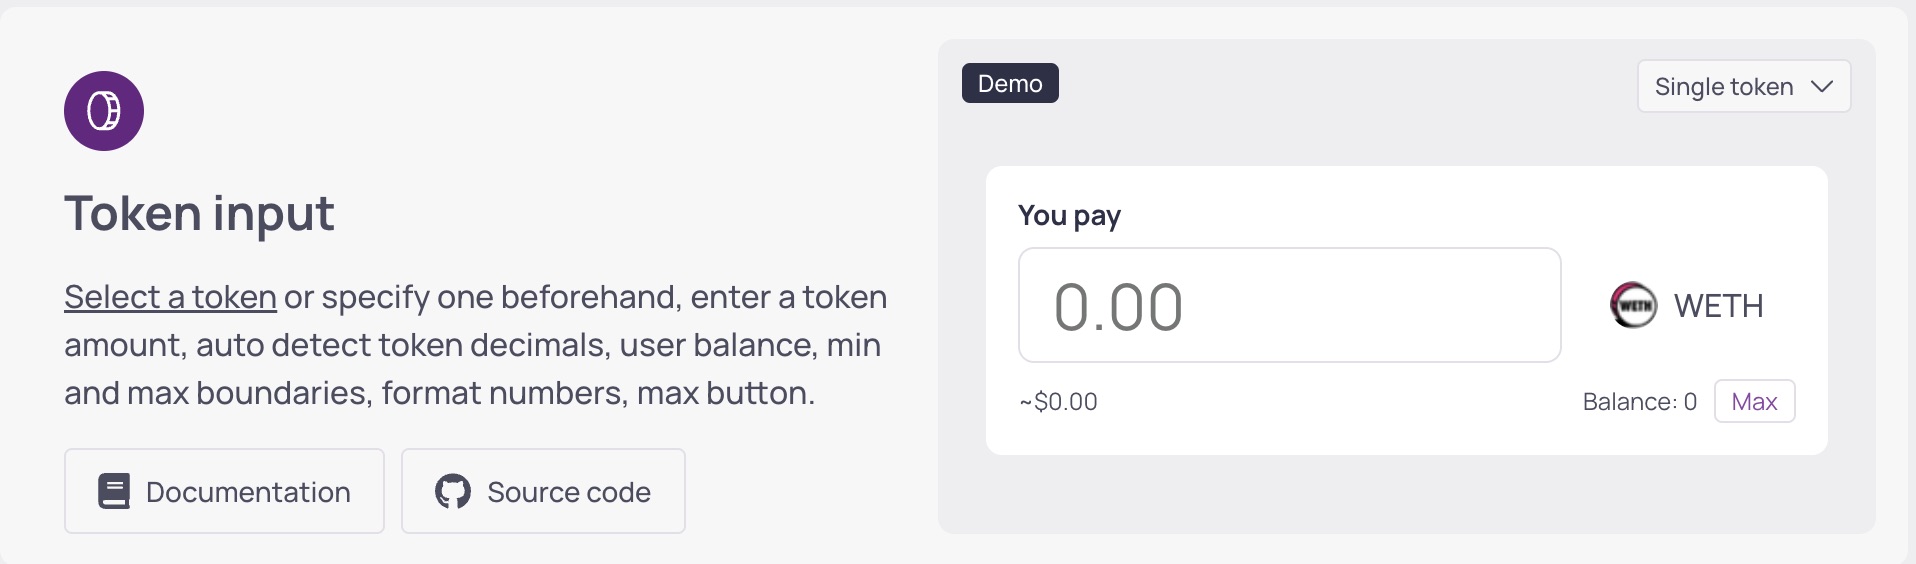
The token input component in the [dAppBooster web3 boilerplate](https://dappbooster.dev/) is a powerful and user-friendly tool designed to simplify blockchain token interactions. It allows users to search for or select tokens from a list, input token amounts, and leverage automated features such as decimal detection, balance tracking, and boundary enforcement. This component is a testament to dAppBooster's commitment to creating intuitive and efficient tools for blockchain developers and users. Below, we'll explore its core strengths, identify areas for improvement, and provide actionable suggestions to enhance the user experience further.
## Core Strengths of the Token Input Component
The [token input component](https://bootnodedev.github.io/dAppBooster/functions/components_sharedComponents_TokenInput.TokenInput.html) stands out for its thoughtful design and user-centric features. It combines simplicity with powerful functionality, making it an essential tool for anyone interacting with blockchain tokens. Here are its key strengths:
### Simple and Clean Design
The component’s minimalistic design ensures users can focus on their tasks without distractions. The uncluttered interface is particularly beneficial for users who may be new to blockchain technology, as it reduces cognitive load and enhances usability.
### Clear Labeling
Each input field and button is precisely labeled, making it easy for users to understand their functions. This clarity reduces the likelihood of errors and improves the overall user experience.
### Auto-Detection Features
The component’s ability to automatically detect token decimals, user balances, and other parameters eliminates manual input errors and streamlines the token interaction process. This automation is a significant time-saver for users and enhances the tool’s reliability.
### Max Button Functionality
The inclusion of a `Max` button allows users to quickly set the maximum available token amount, simplifying the process of transferring or interacting with tokens. This feature is particularly useful for users who want to maximize their token utilization without manual calculations.
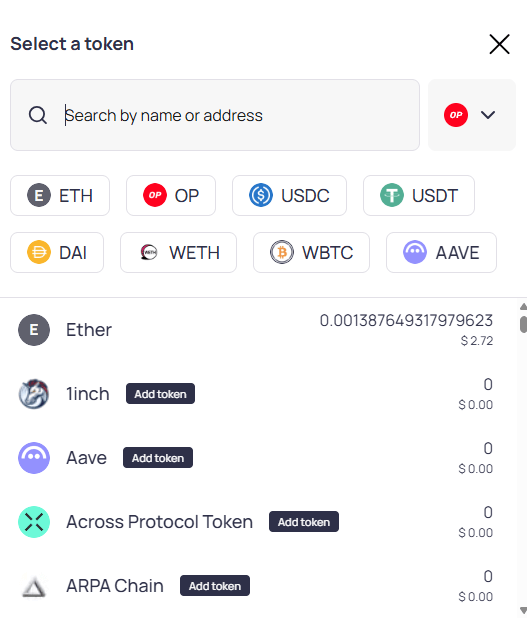
### Token Selection with Search and Featured List
The [token list](https://bootnodedev.github.io/dAppBooster/variables/components_sharedComponents_TokenSelect.TokenSelect.html) includes a search input and a featured list, making it easy for users to find and select tokens quickly. This feature is especially helpful in environments where users interact with a wide variety of tokens.
## Enhancement Opportunities
While the token input component is already a robust tool, there are several areas where it can and will be improved to further elevate the user experience:
### Error Handling and Messaging
Error messages could be more informative and actionable. Implementing clear, context-specific error messages that guide users on how to resolve issues would greatly enhance user satisfaction. For example, if a user inputs an amount exceeding their balance, the error message should suggest reducing the amount or checking the wallet balance.
### Mobile Optimization
The select token modal may not be fully optimized for smaller screens. Redesigning the modal layout for mobile devices, ensuring that buttons, input fields, and token lists are easily accessible and readable, would improve usability.
### Accessibility Enhancements
The component may not fully align with web accessibility guidelines (WCAG). Conducting an accessibility audit to ensure compatibility with assistive tools like screen readers would make the component more inclusive. Implementing ARIA labels, keyboard navigation, and high-contrast modes will further enhance accessibility for users with disabilities.
## Conclusion
**The token input component in dAppBooster is a well-designed and efficient tool that simplifies blockchain token interactions.** Its clean design, clear labeling, and automated features make it a standout choice for developers and users alike. However, there is always room for improvement. By enhancing error handling, optimizing for mobile, improving accessibility, and adding customizable features, dAppBooster can further solidify its position as a [leading web3 boilerplate provider](https://dappbooster.dev/).
The component has been successfully integrated into live applications such as the [Gnosis Chain Bridge](https://bridge.gnosischain.com/?fromChainId=1&token=&amount=), demonstrating its real-world usability in cross-chain applications. Further refinements can enhance its compatibility with various blockchain environments.
At [Bootnode](https://bootnode.dev/), we are committed to delivering tools that are not only functional but also user-centric and inclusive. By addressing these enhancement opportunities, we aim to provide a seamless and empowering experience for all users, regardless of their technical expertise or device preferences.
---
## Quality Assurance in Web3: Setting Up for Testing
Date: 2025-03-19T17:02:00-03:00
Author: Iñaky Maisterrena
URL: https://blog.bootnode.dev/posts/quality-assurance-in-web3-setting-up-for-testing
Testing in [Web3 development](https://dappbooster.dev/) requires a different approach than traditional software testing. One of the first steps is ensuring you have the necessary gas tokens to interact with smart contracts and execute transactions. This blog article will guide you through obtaining gas tokens, bridging them across different EVM chains, and creating ERC20 tokens for testing purposes.
## What Are Testnets and Why Are They Necessary?
Testnets are blockchain networks designed for testing without using real assets. They function like mainnets but use test tokens with no monetary value, allowing developers and QA teams to experiment safely before deploying on a live network.
Using testnets helps identify bugs, optimize gas costs, and ensure smart contract functionality without financial risk. Popular Ethereum testnets include [**Sepolia**](https://sepolia.etherscan.io/) and [**Holešky**](https://holesky.etherscan.io/), while other EVM chains have their own test networks, such as [**Arbitrum Sepolia**](https://sepolia.arbiscan.io/) and [**Optimism Sepolia**](https://sepolia-optimism.etherscan.io/).
## 1. Getting Gas Tokens for Testing
Ethereum transactions require ETH to cover gas fees. If you're testing on mainnet, you'll need real ETH, but for testnets, you can get free ETH from faucets. Here's how:
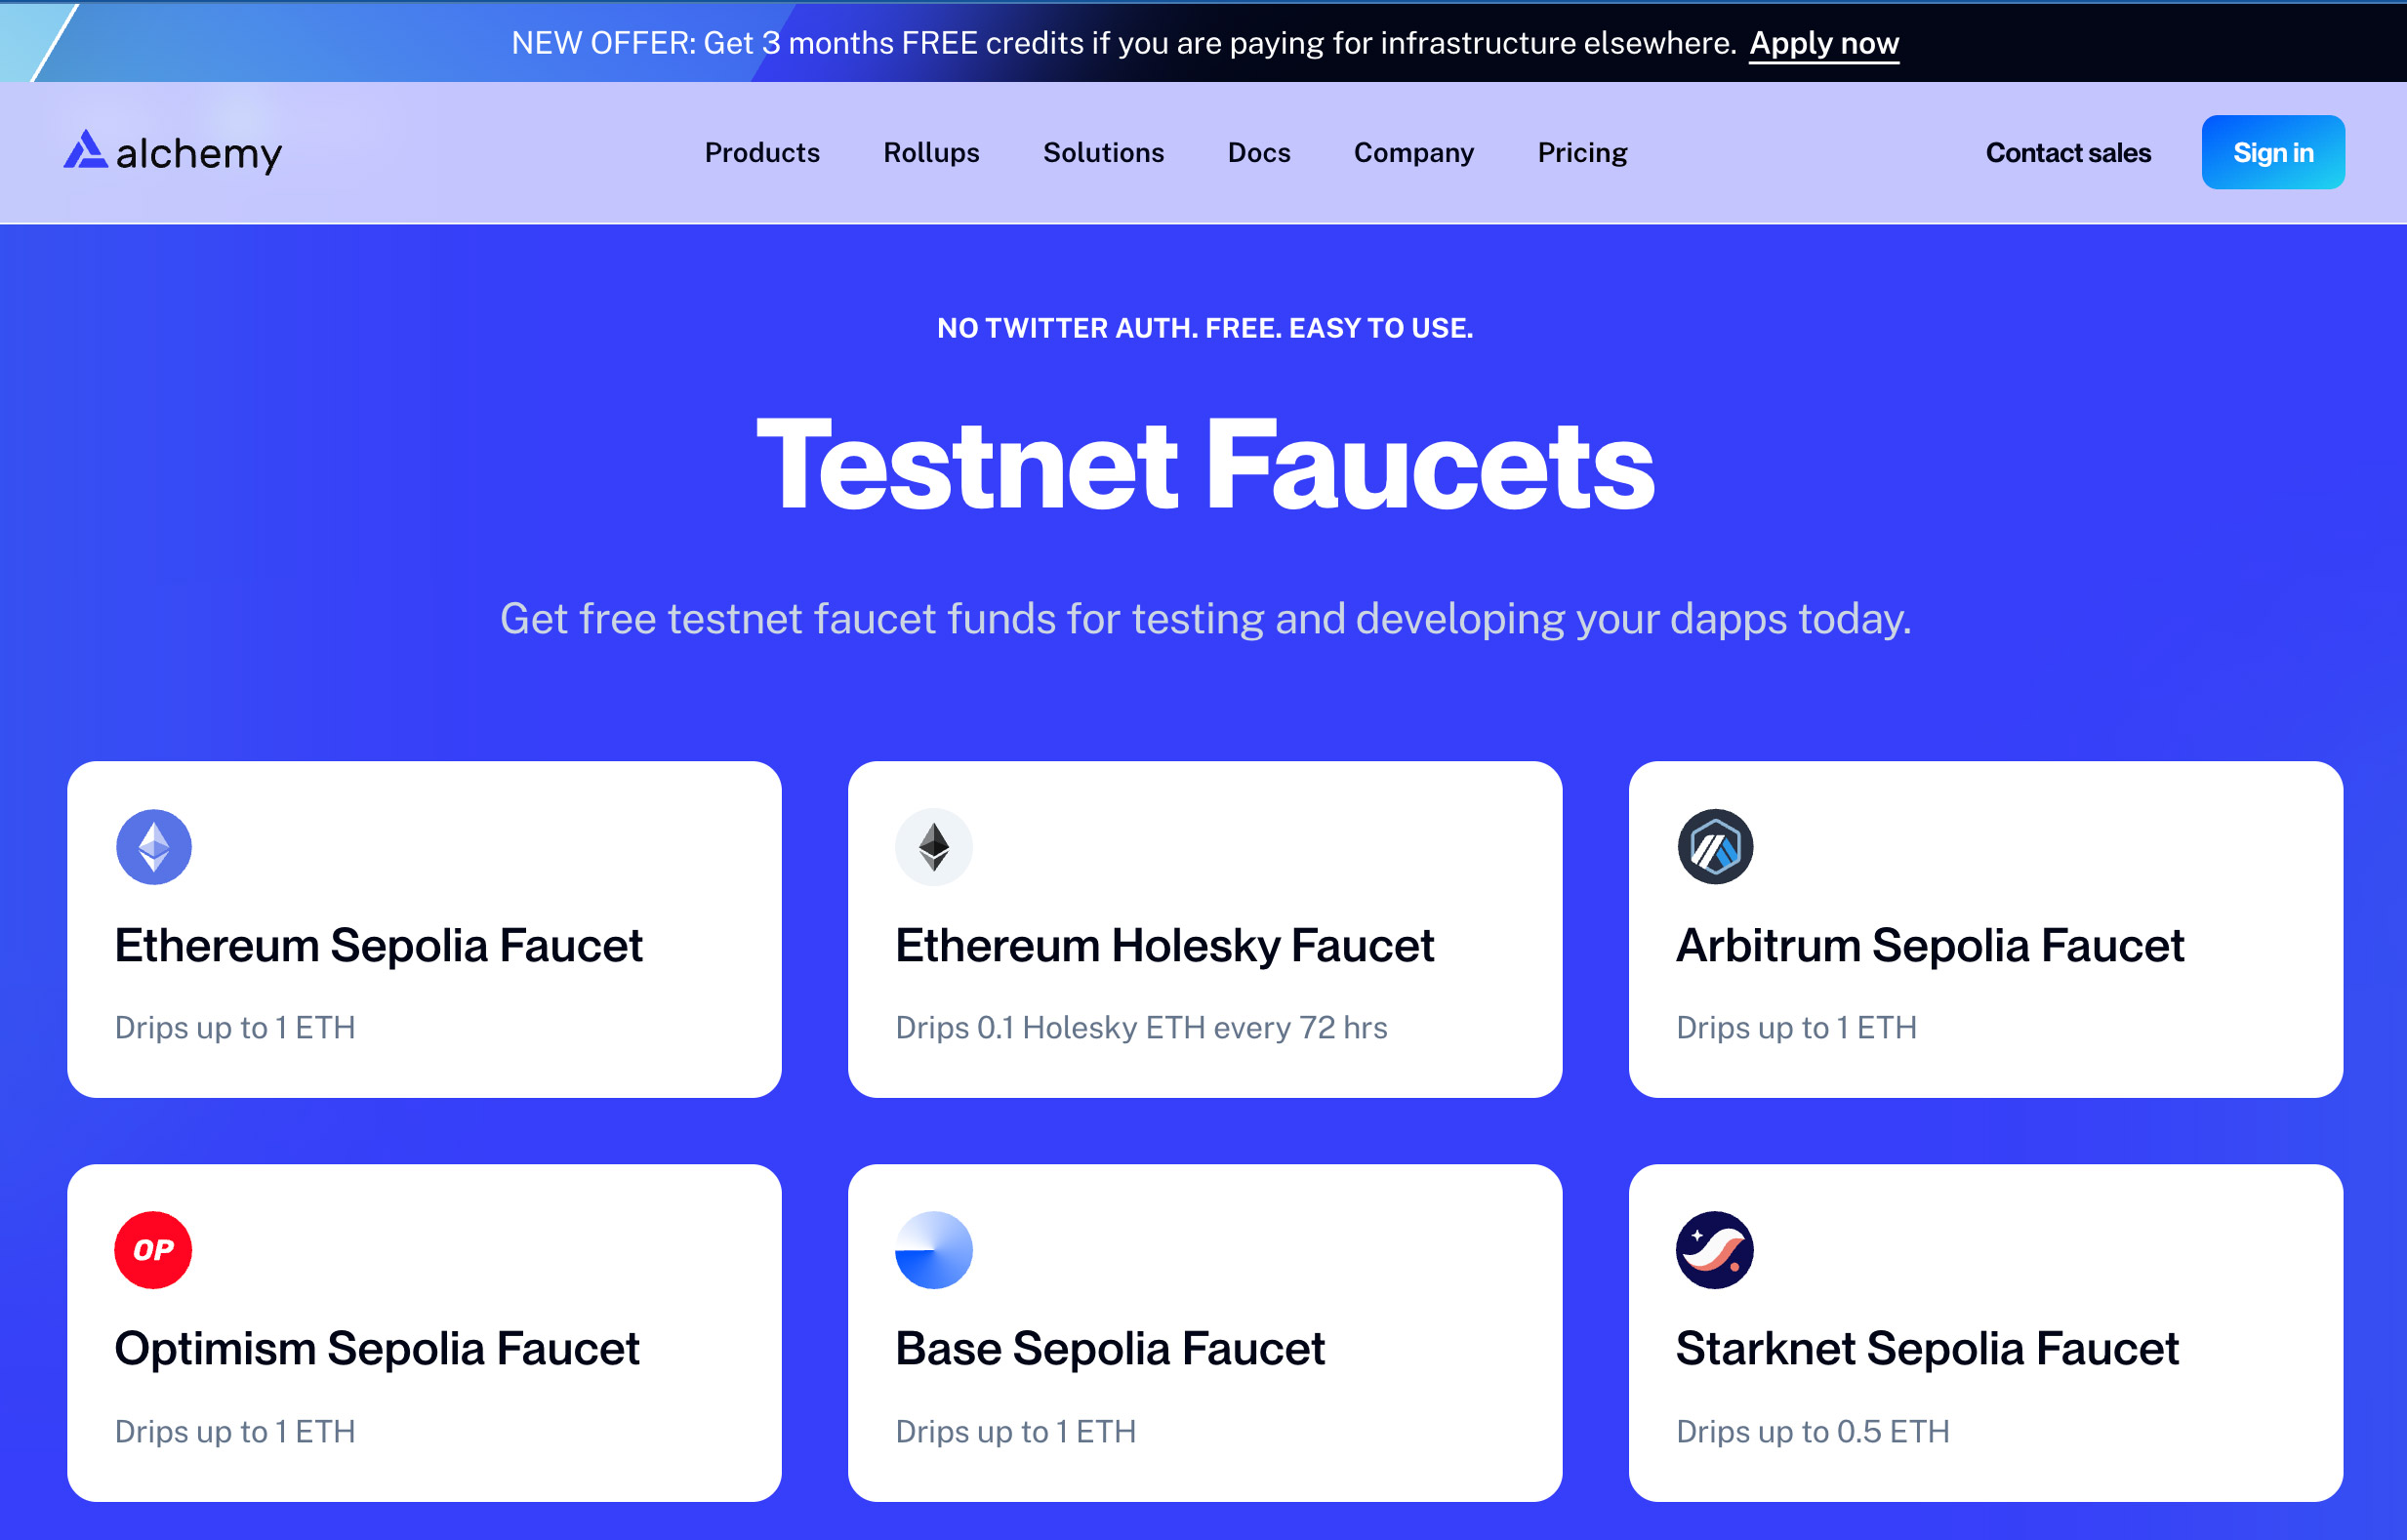
### Ethereum Testnets
- **Sepolia**: Use [Alchemy Faucet](https://www.alchemy.com/faucets) or [Infura Faucet](https://www.infura.io/faucet).
- **Holešky**: Currently supported by [Google Cloud Web](https://holeskyfaucet.com/).
## 2. Bridging Gas Tokens to Other EVM Chains
Once you have ETH, you might need to bridge it to another network like **Arbitrum, Optimism, Base, or Polygon**. Bridges allow you to move ETH from Ethereum mainnet to Layer 2s or sidechains.
### Popular Bridges for ETH and Gas Tokens
- **[Arbitrum Bridge](https://bridge.arbitrum.io/)** - Move ETH from Ethereum to Arbitrum.
- **[Optimism Gateway](https://app.optimism.io/bridge)** - Bridge ETH to **Optimism, Base, Mode, and the OP Superchains**.
- **[Polygon PoS Bridge](https://wallet.polygon.technology/bridge)** - Bridge ETH to **Polygon Amoy**.
### Bridging Process
1. Connect your wallet to the bridge UI.
2. Select the network you're bridging from (**Ethereum**) and to (**e.g., Arbitrum**).
3. Choose the asset (**ETH**) and the amount.
4. Confirm and approve the transaction.
5. Wait for confirmation, which varies depending on the chain.
## 3. Creating ERC20 Tokens for Testing
For Web3 QA, you might need **ERC20 tokens** to test dApps, liquidity pools, or token-based contracts. Below is a simple step-by-step guide to deploying a test ERC20 token.
### Step-by-Step Guide to Deploying an ERC20 Token
#### **Step 1: Use Remix IDE**
1. Go to [Remix Ethereum](https://remix.ethereum.org/).
2. Create a new Solidity file (e.g., `TestToken.sol`).
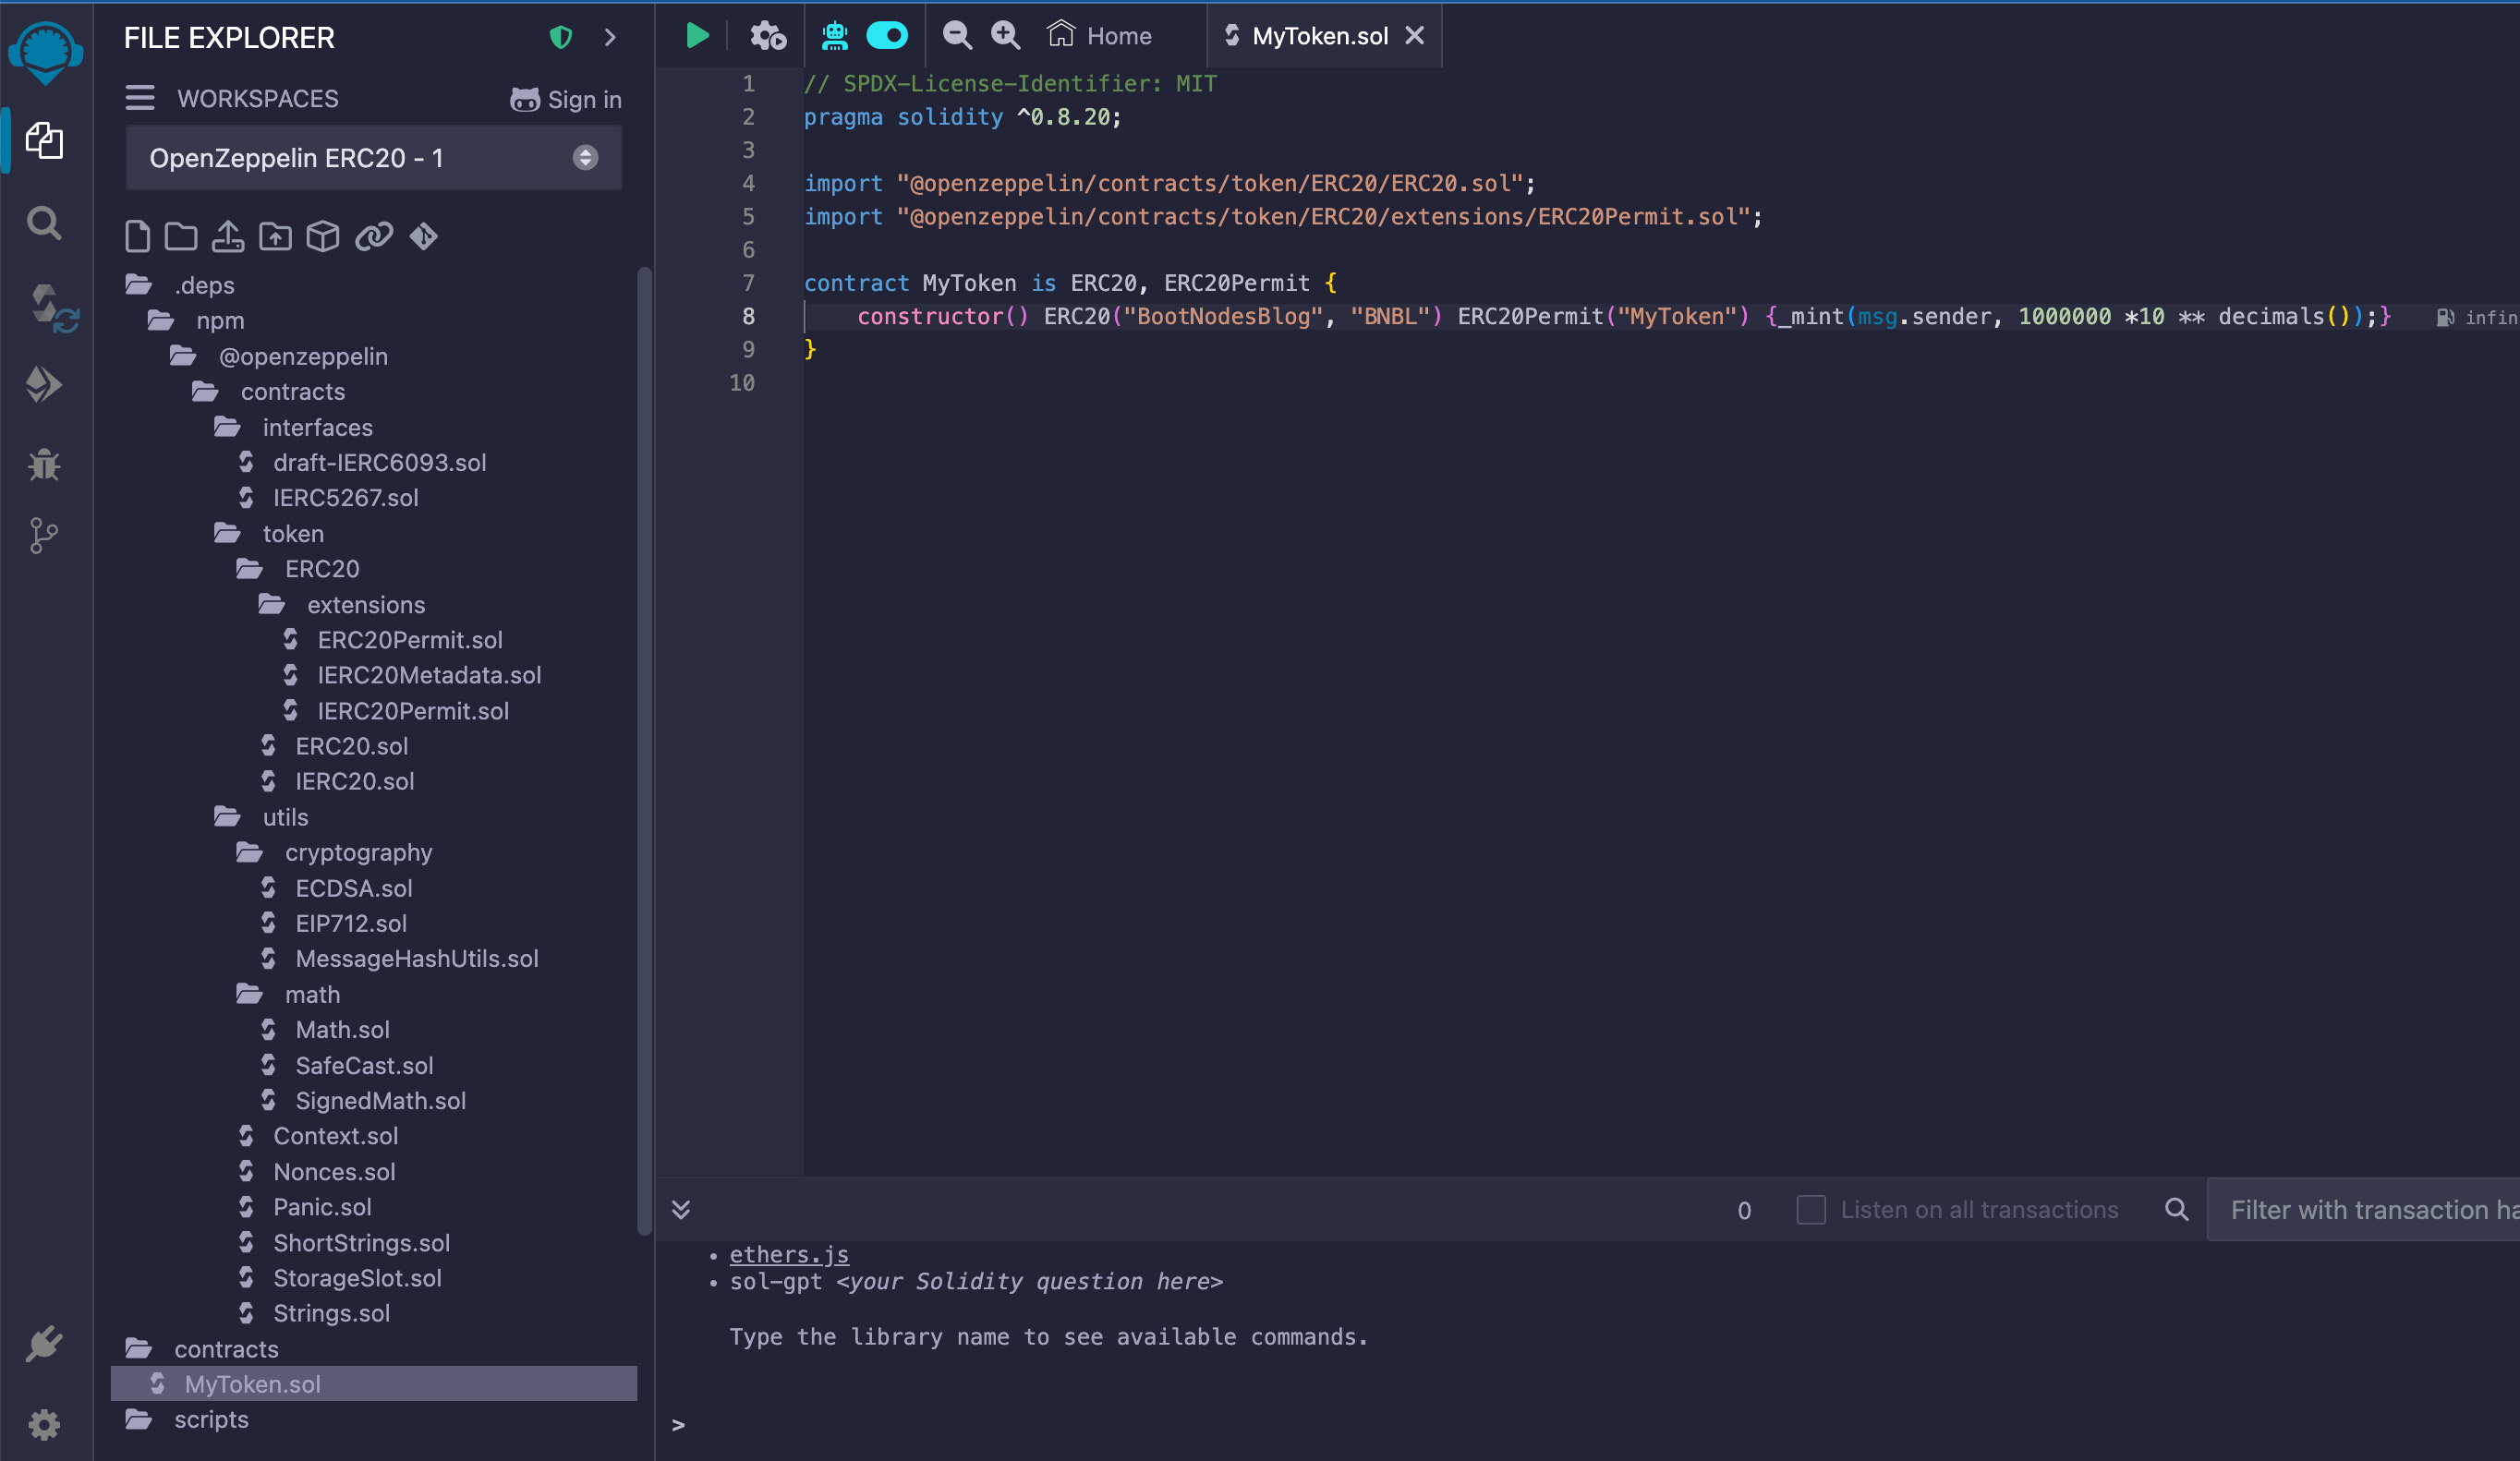
#### **Step 2: Paste the ERC20 Contract Code**
```
// SPDX-License-Identifier: MIT
pragma solidity ^0.8.19;
import "@openzeppelin/contracts/token/ERC20/ERC20.sol";
contract TestToken is ERC20 {
constructor() ERC20("TestToken", "TTK") {
_mint(msg.sender, 1_000_000 * 10 ** decimals());
}
}
```
### Step 3: Compile the Contract
- In Remix, navigate to the **Solidity Compiler** tab.
- Select **0.8.19** or a compatible compiler version.
- Click **Compile TestToken.sol**.
### Step 4: Deploy the Contract
1. Go to the **Deploy & Run Transactions** tab.
2. Select the environment:
- **Injected Provider (MetaMask)** to deploy on the network currently set in your wallet.
- **Remix VM** for local testing.
3. Deploy the contract.
4. Once deployed, you'll see your token contract under **Deployed Contracts**.
### Step 5: Interact with the Token
- Use **MetaMask** to add the token by entering the contract address.
- Mint more tokens by modifying the `_mint` function if needed.
## Verifying Your Token
You can verify your recently created token by following this process: [Verify and publish smart contracts on Etherscan](https://scribehow.com/shared/Verify_and_publish_smart_contract_on_Etherscan__hzIAzjUOT_yEmNrmfbnfFw?referrer=workspace).
---
By following these steps, you ensure a smooth **testing process in [Web3](https://github.com/bootnodedev/dappbooster/)**, whether you're working with **gas tokens, bridges, or test tokens**. Proper QA helps mitigate issues before deployment, saving costs and reducing potential failures in production.
## Related articles
- Web3 Testing: Make Your Dream DApp a Reality with This Guide
- How I Test Web3 Products Before Release: A QA Engineer's Perspective
---
## Kickstarting Your dApp Journey with dAppBooster!
Date: 2025-03-14T17:00:00-03:00
Author: BootNode
URL: https://blog.bootnode.dev/posts/kickstarting-your-dapp-journey
Starting your journey into decentralized app development can be overwhelming, but [dAppBooster](https://dappbooster.dev/) simplifies the process. As the first article in this blog series, we'll introduce you to this [powerful web3 template](https://github.com/bootnodedev/dappbooster/) that streamlines dApp creation by combining modular design, efficient tooling, and clear guidance for developers. Whether you're building your first dApp or refining an existing one, this toolkit is designed to save time and reduce complexity.
**dAppBooster**'s strength lies in its modular structure, which allows developers to pick and choose components that best suit their project. With clear documentation and flexible templates, it empowers developers to build scalable, maintainable dApps without starting from scratch.
[Getting started](https://docs.dappbooster.dev/introduction/getting-started) is straightforward: **dAppBooster**'s setup process is designed to reduce friction, with clear installation steps and useful defaults that let developers dive straight into coding. From initializing a project to deploying it on the blockchain, **dAppBooster** walks you through each stage, ensuring even newcomers can confidently get their dApp up and running in no time. The combination of intuitive design and thoughtful documentation makes it accessible for developers of all skill levels.

One of **dAppBooster**'s standout features is its focus on best practices. It encourages clean code organization, security-first design, and efficient resource management. This proactive approach minimizes technical debt and reduces the risk of common pitfalls in dApp development. With [BootNode](https://www.bootnode.dev/)'s support, developers gain access to reliable support and maintenance that simplify network interactions, ensuring their applications perform smoothly.
For those transitioning from traditional web development or [exploring blockchain for the first time](https://docs.dappbooster.dev/recipes/my-first-dapp), **dAppBooster** bridges the gap. By blending familiar development concepts with Web3 innovations, it offers a smoother learning curve while still delivering powerful tools to experienced blockchain developers. This balance makes it ideal for both small-scale experiments and production-ready dApps.
Stay tuned for practical insights and strategies to elevate your dApp development workflow!
## Some useful links:
* [dAppBooster](https://dappbooster.dev/): The official website for dAppBooster, a powerful web3 template for decentralized app development.
* [dAppBooster Documentation](https://docs.dappbooster.dev/): Guides and tutorials to help you get started with dAppBooster.
* [Our Projects](https://www.bootnode.dev/#caseStudies): BootNode's portfolio of innovative web3 projects and solutions.
---
## dAppBooster
Date: 2025-02-28T16:00:00-03:00
Author: Pablo Ragalli
URL: https://blog.bootnode.dev/posts/dappbooster
## Welcome to the Future of Web3
_Note: This article was [originally published](https://third-tugboat-12f.notion.site/dApp-Booster-b634a6788efb4440a5ccb0a864d761bc) on __September 16, 2024__. An updated and corrected version follows._
### What is dAppBooster?
In the rapidly evolving world of web3, developers are constantly seeking tools that simplify and accelerate the creation of decentralized applications (dApps). Enter dAppBooster, a powerful tool designed to streamline the dapp development process and enhance productivity.
__dAppBooster__ is an advanced open-source starter kit specifically tailored for developers building dApps. It combines flexibility, modularity, and comprehensive documentation to provide everything you need to hit the ground running with your dapp projects.
### Key Features of dAppBooster
**Comprehensive Component Library** that offers essential components for developing decentralized applications such as Wallet Connectivity, Subgraphs Manager, Token Manager, Transaction Manager, Hash Manager, and UI Components.
**Integration with Leading Technologies** such as **wagmi** and **viem**. Plus, a **subgraph component** that allows developers to easily connect with The Graph, simplifying data querying and integration.
**Modern UI Libraries and Styles** to ensure a sleek and consistent design we utilize modern-normalize to standardize browser default styles and Styled Components for CSS-in-JS, facilitating style management. Our setup supports themes through Next Themes, offering light and dark mode options. Additionally, we provide resizable components to adapt seamlessly to any device, ensuring a responsiveness. The styling process also includes tools like Stylelint for linting Styled Components for parsing styles, enhancing code maintainability and readability.
**Robust Version Control** for robust version control, __dAppBooster__ follows GitHub Flow for a streamlined and efficient workflow. We also adhere to Semantic Versioning (SemVer) standards for version numbering to maintain clarity and consistency in our releases. This approach helps us manage changes and communicate updates effectively.
**Extensive Documentation**, __dAppBooster__ provides thorough and user-friendly documentation to help developers easily understand and utilize all features and components. Take a look here: https://docs.dappbooster.dev
### Why Use dAppBooster?
- **Ease of Use:** Whether you're a seasoned developer or new to web3, __dAppBooster__ simplifies the development process. It provides a user-friendly interface and detailed documentation to help you get started quickly and efficiently.
- **Accelerate Development:** With its comprehensive library of pre-built components and integration tools, __dAppBooster__ speeds up the development process, allowing you to launch your dapp faster.
- **Stay Current:** Regular updates and community contributions keep __dAppBooster__ aligned with the latest advancements in web3 technology.
- **Reduce Costs:** By streamlining development and reducing the need for custom coding, dAppBooster helps lower the overall cost of building and maintaining dApps.
### Getting Started with dAppBooster
Getting started with __dAppBooster__ is straightforward. Visit the [web page](https://dappbooster.dev/) to access the source code, documentation, and tutorials. Whether you're building a new dapp from scratch or enhancing an existing project, __dAppBooster__ provides the tools you need to succeed.
### Sponsored By
We are proud to announce that __dAppBooster__ is sponsored by the grants provided by Optimism. This support from Optimism's grant program has been instrumental in helping us bring our vision to life and develop a tool that will greatly benefit the web3 community. We are grateful for their commitment to fostering innovation and advancing the ecosystem.
### What is next
We are excited to be working on additional functionality that will empower developers to build more advanced features! Stay tuned for those:
- Adding transaction components such as a __Pending Transaction__ view similar to Uniswap and a __Transaction History__ feature.
- Enhancing the system to display __Subgraph__ status and enable deployment to IPFS.
- Integration with Tenderly to provide advanced monitoring capabilities.
- Modular plug-in system to allow for quick and seamless integration of network-specific libraries
- Components that will facilitate easier integration with the __Optimism__ ecosystem.
- Migrate our styling solution to Chakra UI for a more robust and feature-rich experience.
- And much more!
---
## Hello Web3 from Bootnode!
Date: 2025-02-11T00:00:00-03:00
Author: BootNode
URL: https://blog.bootnode.dev/posts/hello-web3
## Welcome to the Future of Web3
*Greetings, web3 pioneers!*
We are excited to launch the official blog of BootNode.dev, a hub for innovation, blockchain, and decentralized technologies.
## Who We Are
[BootNode.dev](https://www.bootnode.dev/) is a team of developers passionate about web3 and building decentralized solutions. We're here to push the boundaries of [blockchain technology](https://github.com/bootnodedev/dappbooster/) and share our journey with the community.
## What to Expect
* **Web3 Tutorials:** Guides on the latest [blockchain tools and frameworks](https://dappbooster.dev/).
* **Project Updates:** Insights into our web3 projects and developments.
* **Industry Trends:** Updates on the fast-evolving world of blockchain and decentralized finance (DeFi).